9 Easy Kawaii Animals to Draw for Beginners (Step-by-Step)
Have you ever stared at a blank page wishing you could fill it with the most adorable little creatures imaginable? 🐱✏️ You’re not alone — and the good news is that learning to draw cute characters is far more achievable than most people think. This guide to 9 Easy Kawaii Animals to Draw for Beginners (Step-by-Step) will walk you through nine irresistibly cute animals, breaking each one down into simple shapes and strokes that anyone can follow, even if you’ve never picked up a sketchbook before.
Kawaii (かわいい) is the Japanese concept of cuteness, and it has exploded into a global art and design trend. In 2026, kawaii-style illustration continues to dominate social media feeds, stationery brands, and digital art communities worldwide. Whether you want to decorate your bullet journal, create stickers, or simply relax with a creative hobby, these nine beginner-friendly kawaii animals are the perfect starting point.
Key Takeaways
- 🎨 Kawaii drawing is beginner-friendly — every animal in this guide starts with basic shapes like circles and ovals.
- 👁️ Big eyes and rosy cheeks are the two most important features that make any animal look kawaii.
- 📐 You only need a pencil, eraser, and black marker to get started — no fancy tools required.
- 🐸 Practice one animal at a time — mastering simple forms builds confidence for more complex drawings.
- 📱 Video tutorials and step-by-step guides (including YouTube playlists and library resources) are widely available to support your learning in 2026.
What Makes a Drawing “Kawaii”? A Quick Primer
Before we dive into the 9 Easy Kawaii Animals to Draw for Beginners (Step-by-Step), it helps to understand the core visual formula behind kawaii art. Once you know the “recipe,” every animal becomes much easier to tackle.
The Kawaii Formula 🌸
| Feature | What to Do |
|---|---|
| Eyes | Make them large, round, and shiny — often with a tiny highlight dot |
| Face shape | Use a big circle or rounded square as the base |
| Cheeks | Add two small pink circles for blush marks |
| Body | Keep it small and chubby relative to the head |
| Expression | Simple curved lines for a smile or closed, happy eyes |
| Details | Minimal — less is more in kawaii style |
💬 “Kawaii art is all about simplicity. The fewer lines you use, the cuter the result tends to be.” — A principle echoed by kawaii illustrators across platforms like Instagram and YouTube.
Tools You’ll Need
You don’t need much to get started:
- A pencil (HB or 2B works great)
- A black fine-tip marker or pen (0.3mm–0.5mm)
- An eraser
- Colored pencils or markers (optional, for adding color)
- Plain white paper or a sketchbook
That’s it. No tablet, no special software — just you and your creativity. 🖊️
9 Easy Kawaii Animals to Draw for Beginners (Step-by-Step)
Now let’s get into the main event. Each animal below includes a step-by-step breakdown. Work through them in order — they’re arranged from simplest to slightly more detailed — or jump to your favorite creature first.
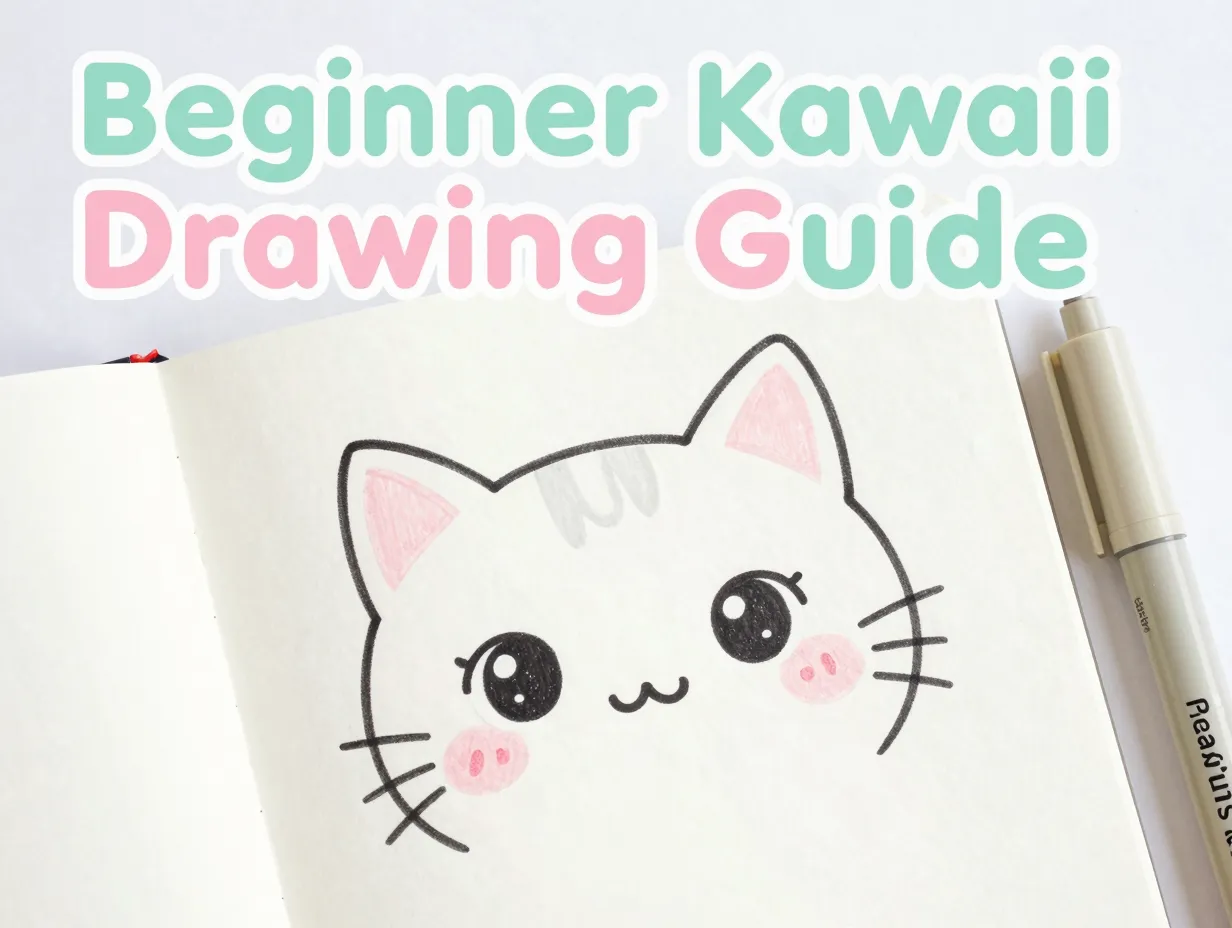
1. Kawaii Cat 🐱
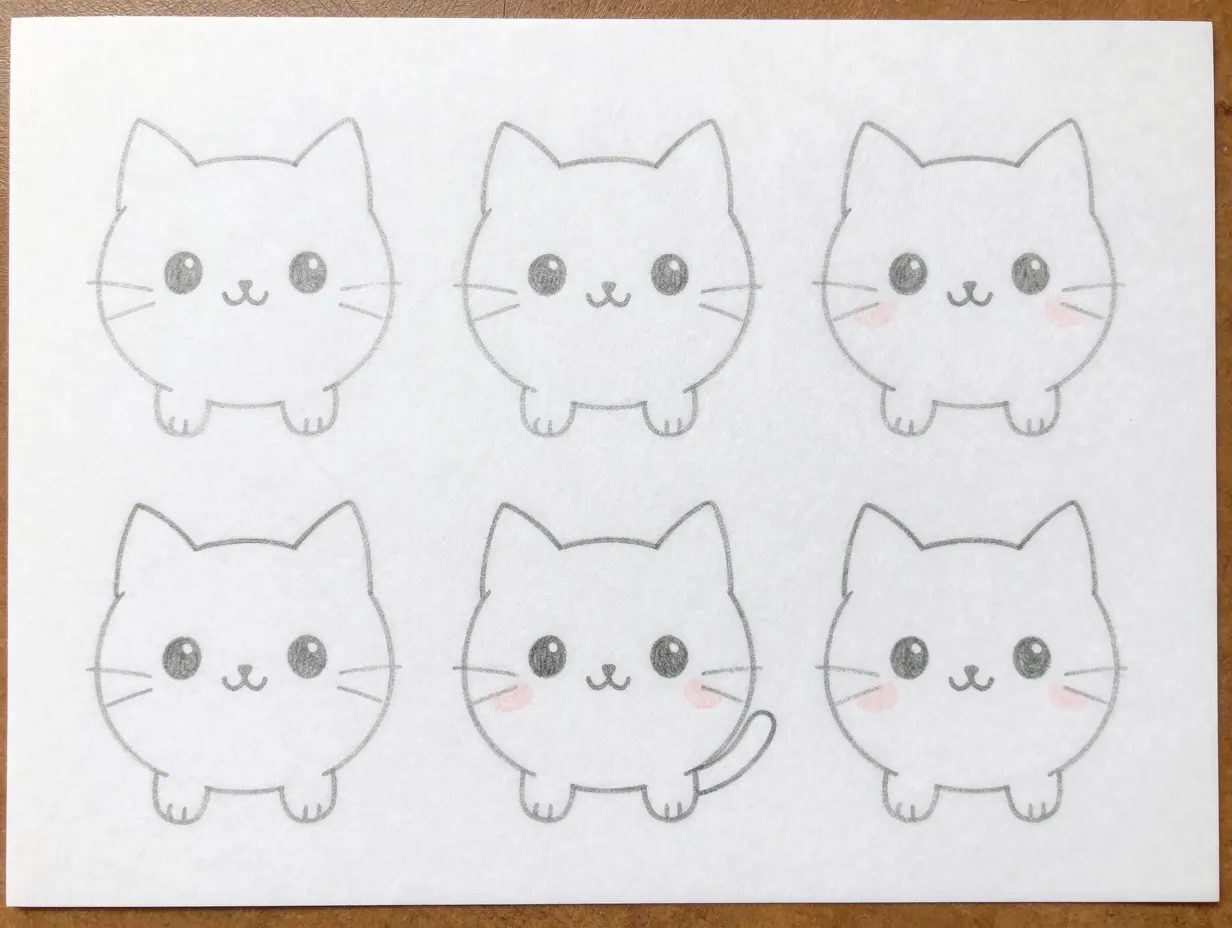
The kawaii cat is arguably the most iconic beginner subject in Japanese-style illustration. Cats appear in nearly every kawaii tutorial collection, and for good reason — their features are minimal and forgiving.
Steps:
- Draw a large circle for the head.
- Add two small triangle ears at the top of the circle.
- Place two large oval eyes in the center of the face, slightly below the midpoint.
- Draw a tiny upside-down triangle for the nose, centered below the eyes.
- Add a small curved “W” shape below the nose for the mouth.
- Draw three short lines on each side of the nose for whiskers.
- Add two small pink circles on the cheeks for blush.
- Sketch a small rounded body below the head — about half the size.
- Add two small oval paws at the bottom.
- Draw a curved tail wrapping around the side.
Pro tip: Keep the ears small and slightly rounded at the tips for an extra-cute look. Ink over your pencil lines and erase when dry.
2. Kawaii Bunny 🐰
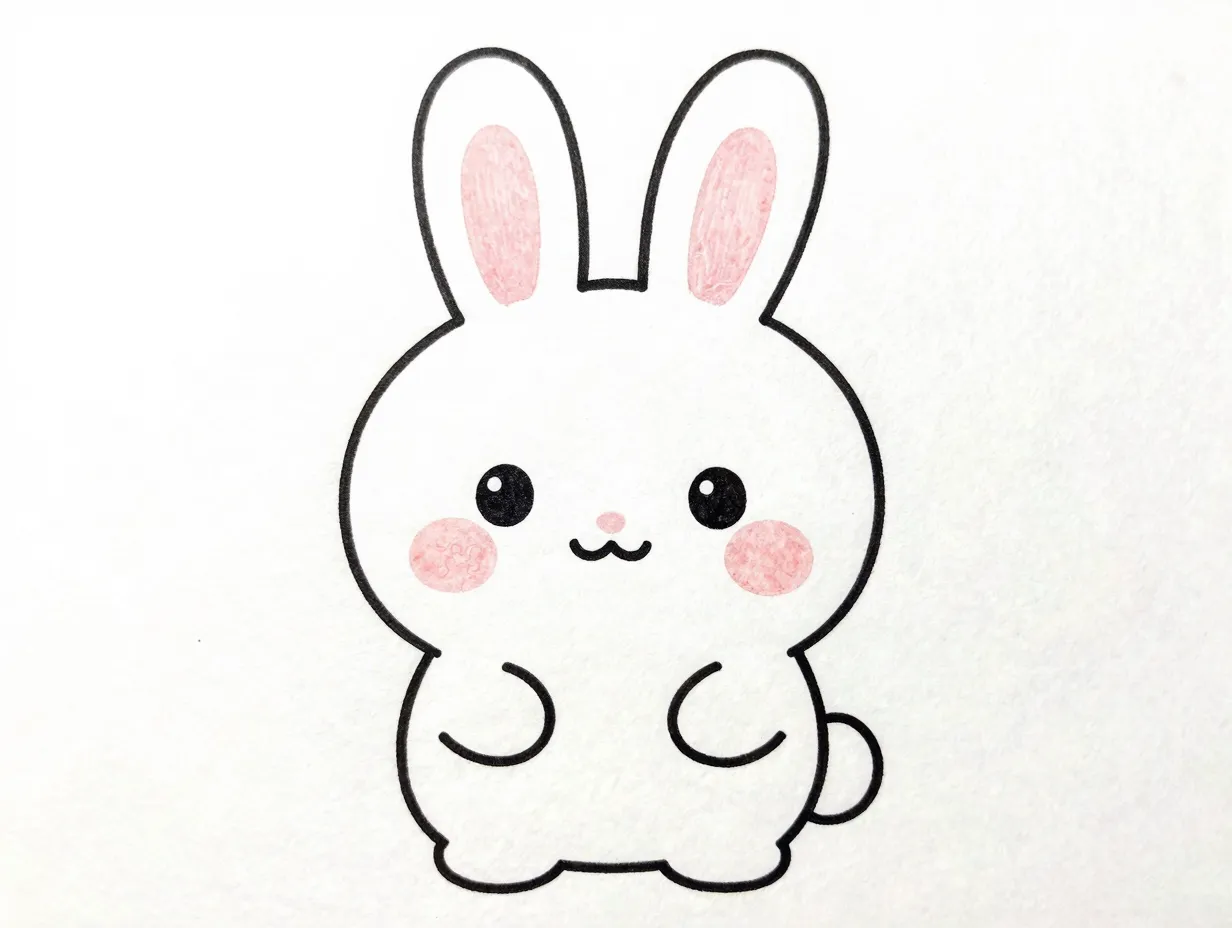
Bunnies are a staple in kawaii art because their long ears give them an instantly recognizable silhouette. This one is just as easy as the cat.
Steps:
- Start with a large circle for the head.
- Draw two tall, narrow oval ears on top of the head.
- Add a smaller oval inside each ear (use pink when coloring).
- Place two large round eyes below the center of the face.
- Draw a tiny dot or small oval for the nose.
- Add a simple curved smile beneath the nose.
- Sketch rosy cheeks with two small circles.
- Draw a round, chubby body below the head.
- Add two small front paws and two slightly larger back feet.
- Finish with a tiny fluffy circle tail at the back.
Pro tip: Make the ears slightly floppy by curving them to one side for a playful variation. 🐾
3. Kawaii Bear 🐻
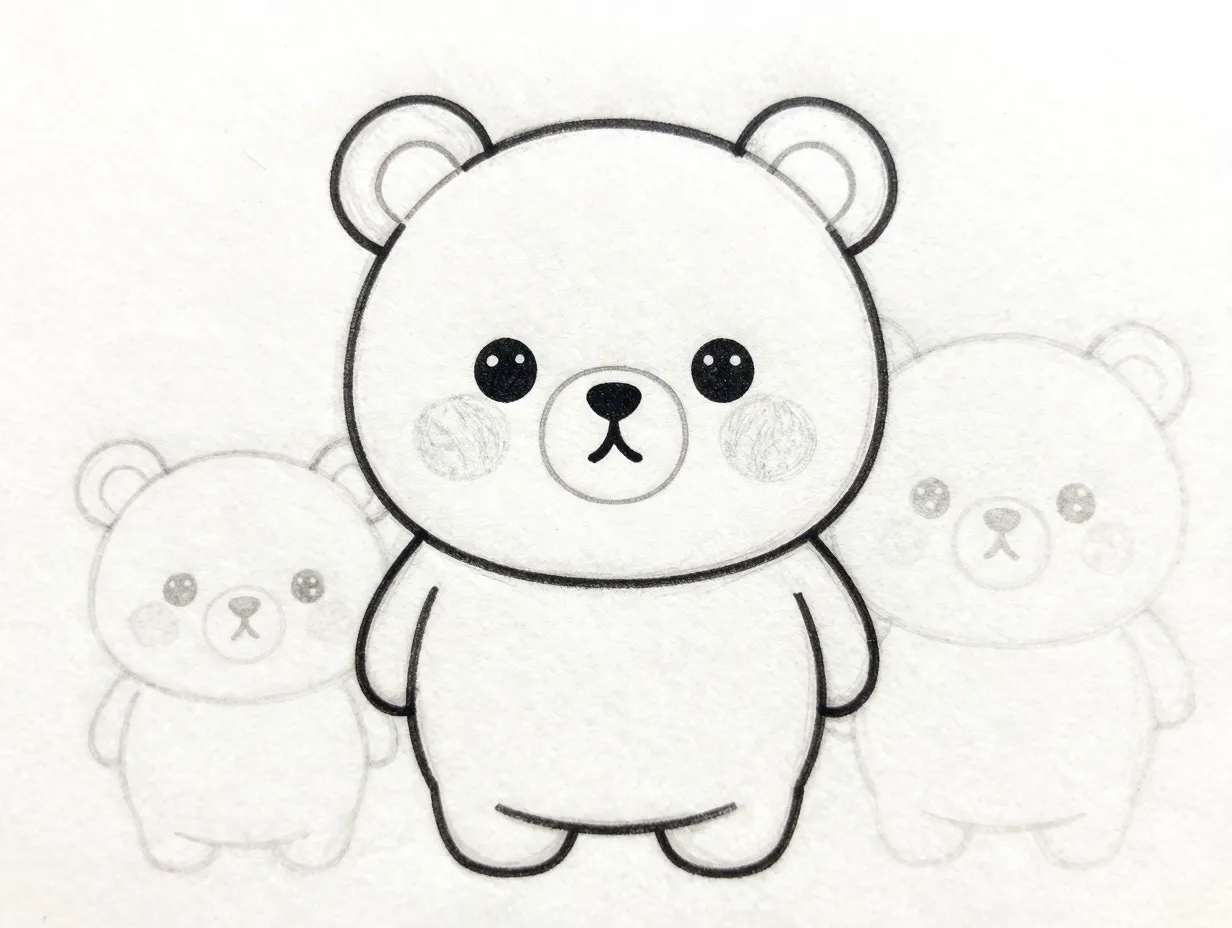
Bears are wonderfully versatile in kawaii style — you can easily turn this base into a panda, brown bear, or polar bear just by changing the color scheme.
Steps:
- Draw a large circle for the head.
- Add two small semicircle ears at the top corners of the head.
- Draw a slightly oval “muzzle” shape in the lower center of the face.
- Place two large eyes above the muzzle.
- Add a small nose on the muzzle and a tiny smile below it.
- Draw blush circles on the cheeks.
- Sketch a round, chubby body.
- Add short, stubby arms and legs.
- Draw small oval paw pads on each foot.
Variation: To make a kawaii panda, add black oval patches around the eyes and black ears. Instant panda! 🐼
4. Kawaii Panda 🐼
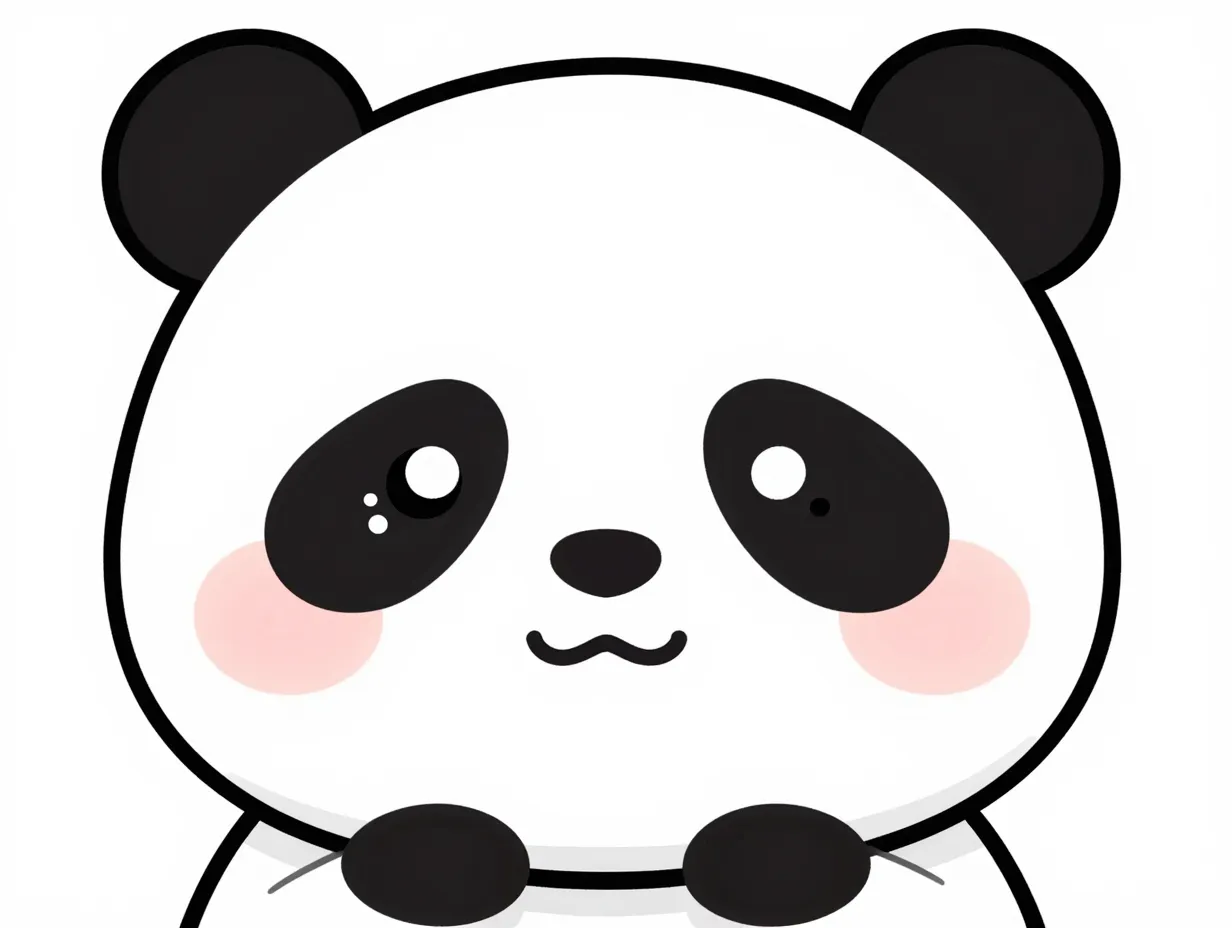
Since the panda deserves its own spotlight, here’s a dedicated breakdown. Pandas are especially popular in kawaii art because their natural black-and-white markings add visual interest without requiring complex drawing skills.
Steps:
- Draw a large circle for the head.
- Add two small rounded ears at the top.
- Fill the ears with black (or shade them in pencil).
- Draw two large oval eye patches — these are black ovals placed diagonally above the center of the face.
- Inside each eye patch, draw a smaller white circle, then a black dot for the pupil, then a tiny white highlight dot.
- Add a small round nose and a gentle curved smile.
- Draw blush marks on the cheeks.
- Sketch a round white body with black arms.
- Add small legs and paw details.
Pro tip: The eye patches are the key to a convincing panda — make them slightly tilted inward for a naturally cute, slightly worried expression. 😊
5. Kawaii Frog 🐸
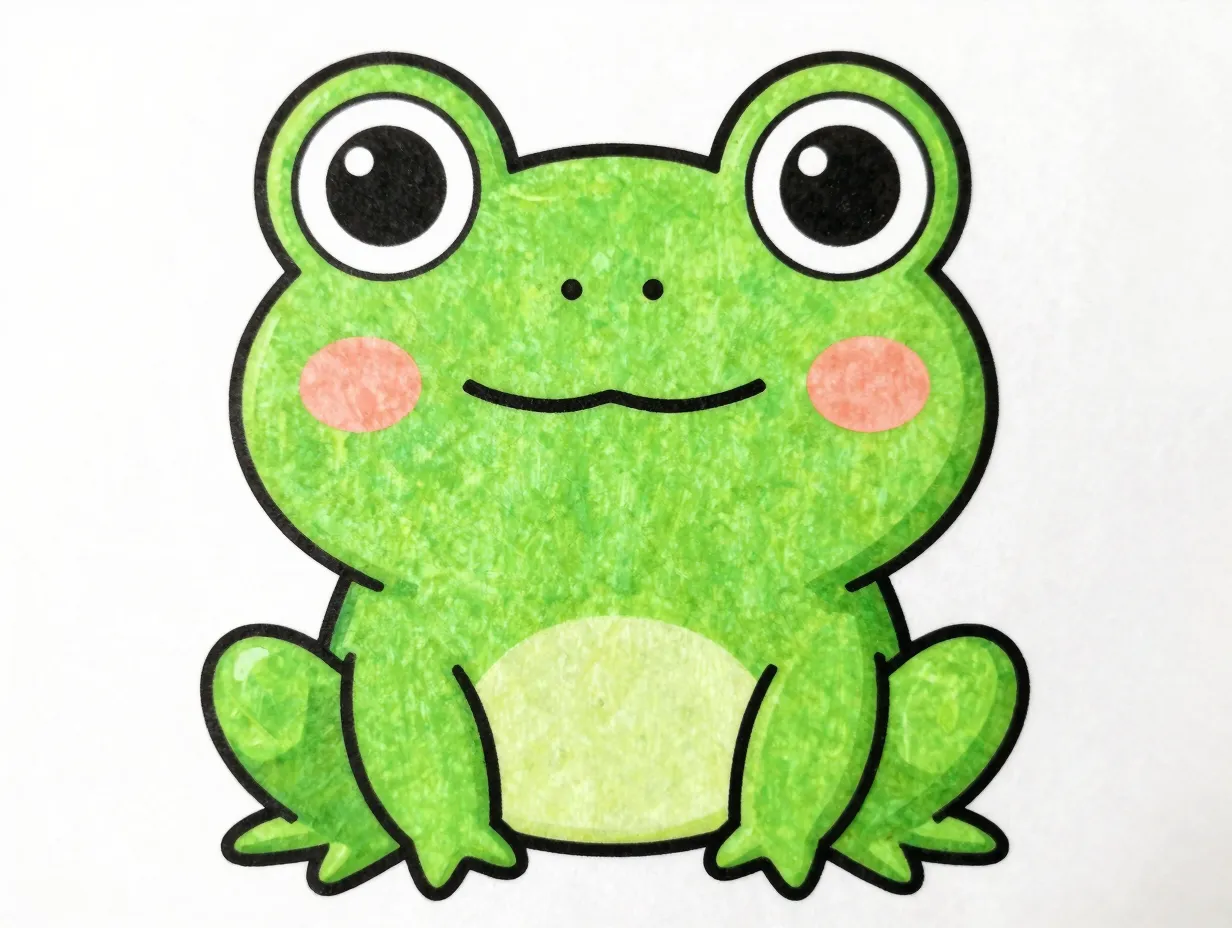
Frogs are a surprisingly fun and easy kawaii subject. Their wide, flat faces and big eyes translate beautifully into chibi-style illustration.
Steps:
- Draw a wide, slightly flattened circle for the head.
- Place two large circles on top of the head for the eyes (frogs have eyes on top of their heads).
- Inside each eye, draw a smaller black circle with a white highlight dot.
- Draw a wide, gentle curved smile across the lower half of the face.
- Add two small nostril dots above the smile.
- Sketch two small blush circles on the cheeks.
- Draw a round, compact body below the head.
- Add two short front arms with tiny three-fingered hands.
- Draw two larger, bent back legs with webbed feet.
Color tip: Use a bright lime green for the body and a slightly lighter green for the belly. 💚
6. Kawaii Owl 🦉
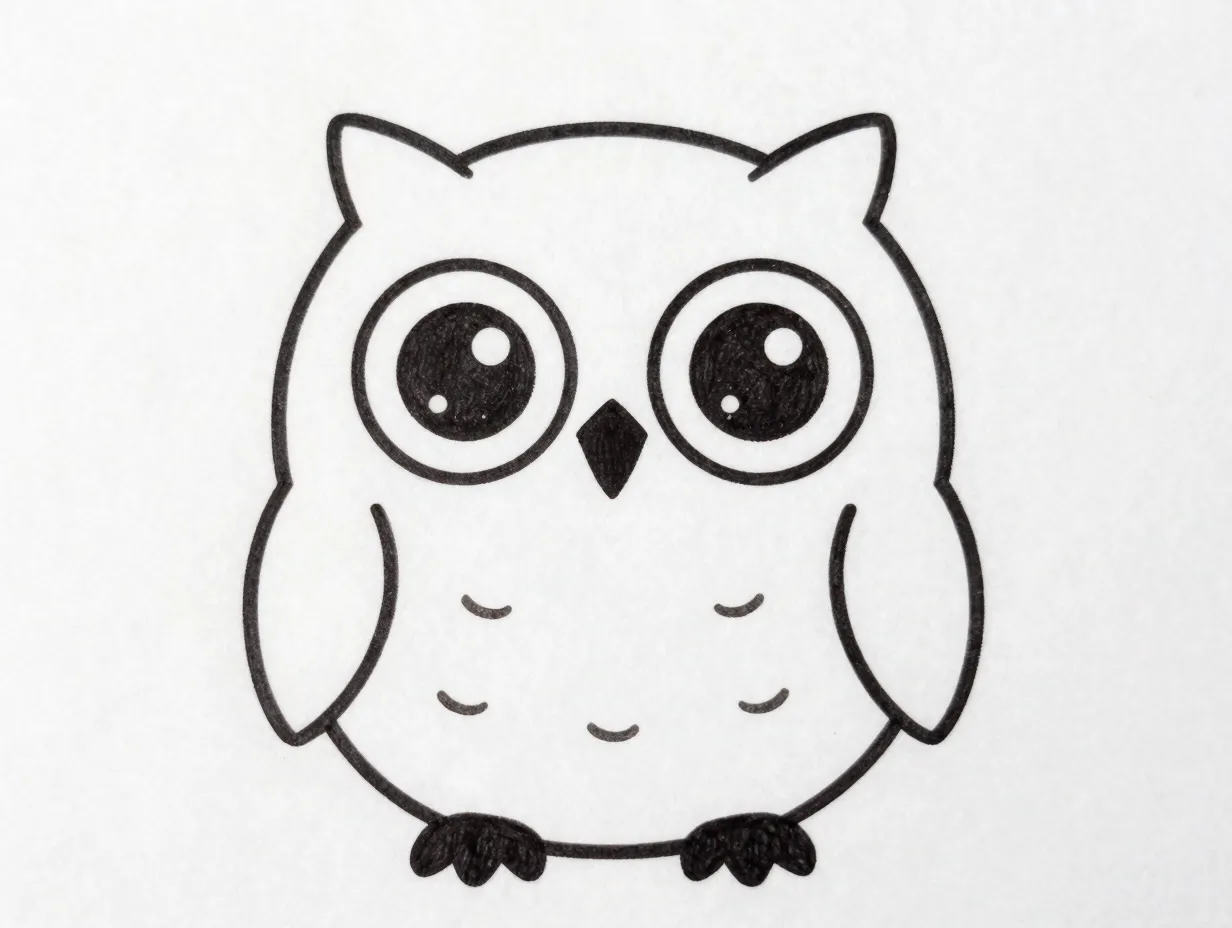
Owls have naturally large eyes, which makes them a perfect fit for kawaii style. The Frisco Library’s drawing guide highlights owls as one of the most beginner-friendly kawaii birds to tackle.
Steps:
- Draw a rounded, slightly tall oval for the body (owls are often drawn as one body-head unit in kawaii style).
- Add two small triangular ear tufts at the top.
- Draw two very large circle eyes in the upper-center area of the body.
- Add pupils and highlight dots inside the eyes.
- Draw a small diamond-shaped beak between and below the eyes.
- Sketch two small wing shapes on either side of the body.
- Add a horizontal line across the lower body to separate the belly.
- Draw small feet with three toes peeking out from the bottom.
- Add blush marks and simple feather texture lines if desired.
Pro tip: Owls look extra kawaii when you make the eyes take up nearly a third of the entire body shape. Go big! 👀
7. Kawaii Dog 🐶
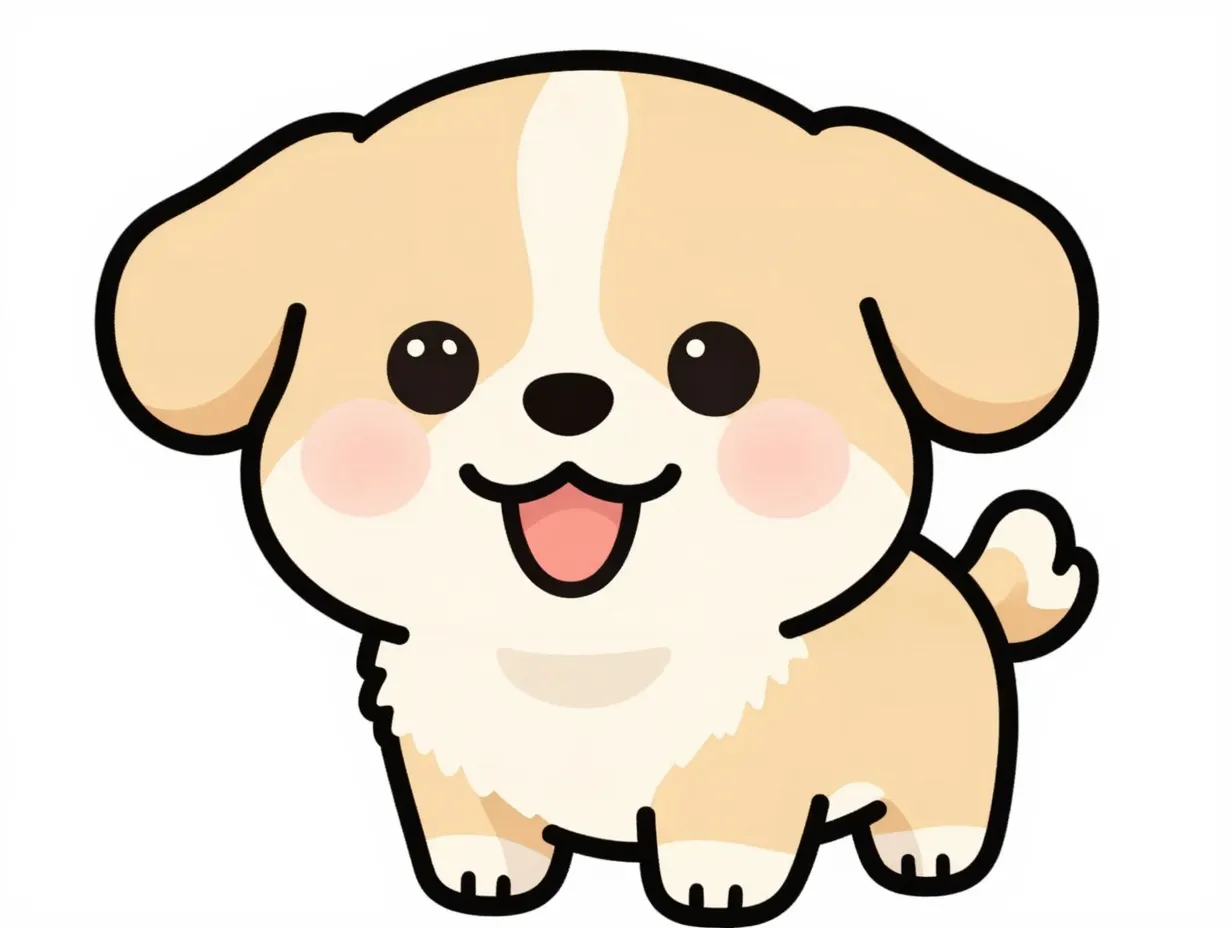
Dogs are endlessly customizable in kawaii style — you can suggest different breeds simply by changing the ear shape. Floppy ears = spaniel vibes; pointy ears = shiba inu vibes.
Steps:
- Draw a large circle for the head.
- Add two floppy, rounded ears hanging down on either side of the head.
- Draw a slightly oval muzzle in the lower center of the face.
- Place two large round eyes above the muzzle.
- Add a small oval nose on the muzzle and a curved smile below it.
- Draw a small tongue peeking out for extra cuteness. 😛
- Add blush circles on the cheeks.
- Sketch a round, compact body.
- Add four short legs and small paws.
- Draw a wagging tail curled upward at the back.
Variation: For a kawaii shiba inu, make the ears small and pointy, and add a lighter-colored oval on the muzzle and inner ears.
8. Kawaii Chick 🐥
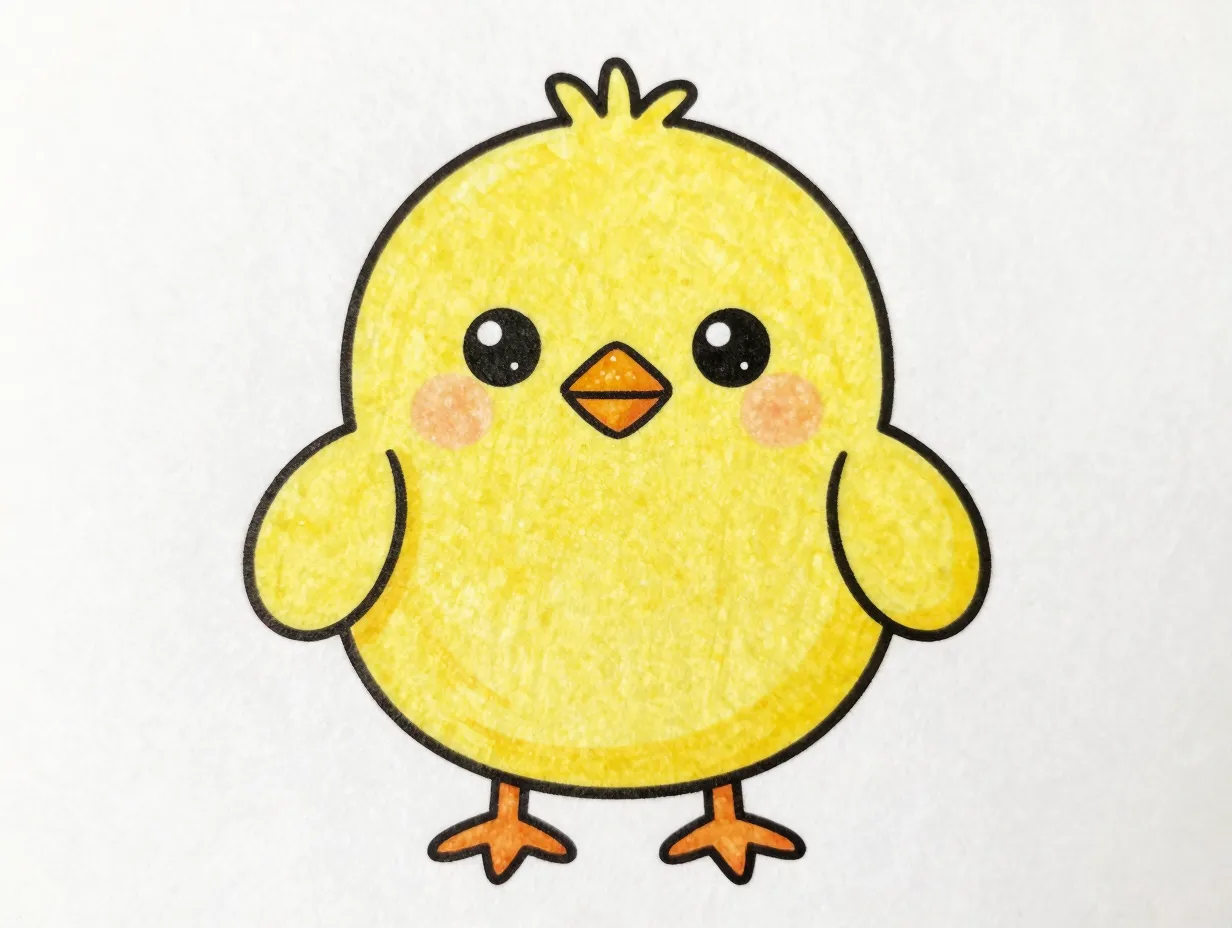
Baby chicks are one of the simplest kawaii animals you can draw — they’re basically a circle with a few tiny details. Perfect if you’re a true beginner or drawing with young children.
Steps:
- Draw a large, slightly oval circle for the body (chicks are mostly body!).
- Add a smaller circle on top for the head, overlapping slightly.
- Draw two small oval wings on the sides of the body.
- Add a tiny diamond beak on the face — fold it in half to suggest an open beak if you like.
- Draw two large, round eyes with highlight dots.
- Add blush circles on the cheeks.
- Sketch two small stick legs with three-toed feet at the bottom.
- Add a few short lines on top of the head for fluffy feathers.
Color tip: Bright yellow with an orange beak is the classic look, but pastel yellow gives a softer, more modern kawaii feel. 💛
9. Kawaii Porcupine 🦔
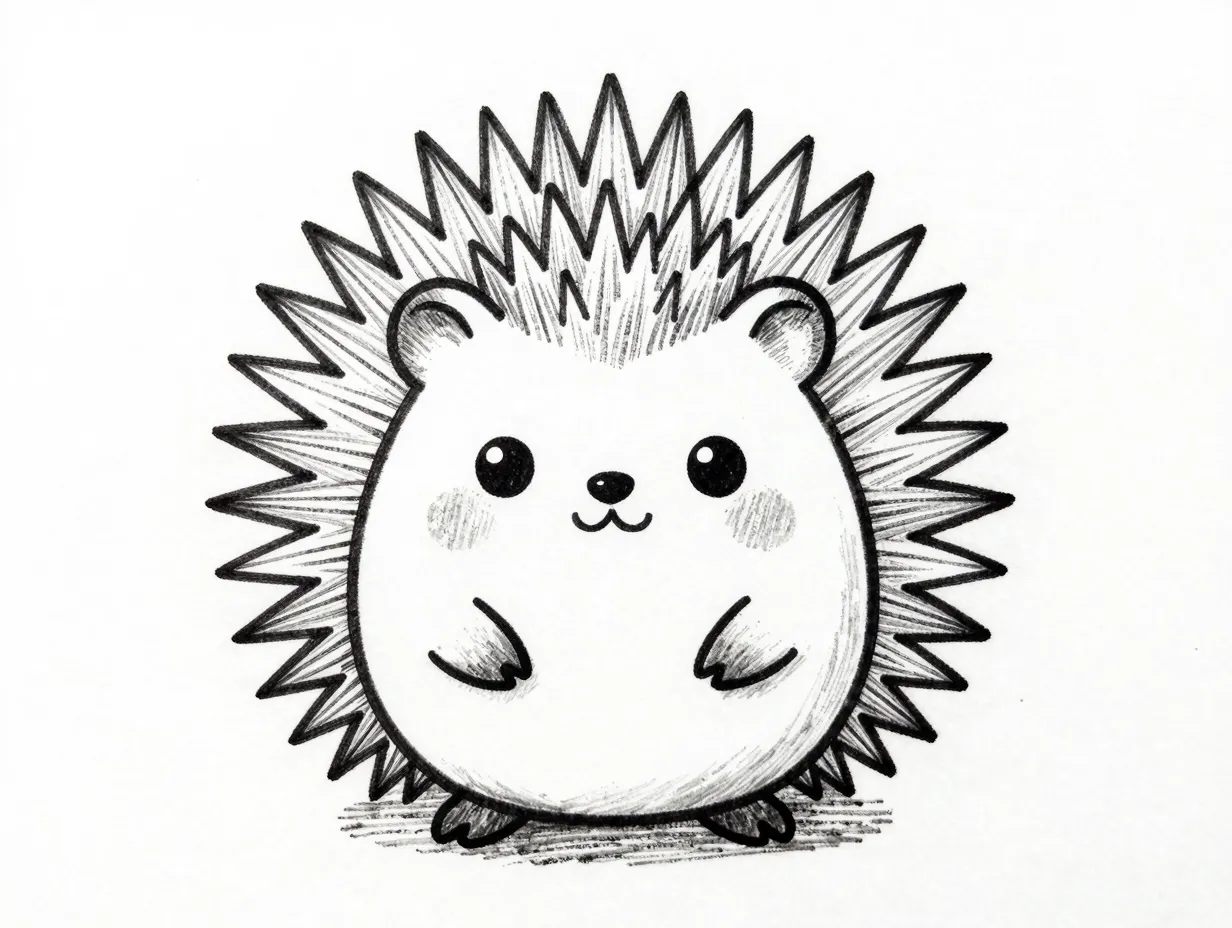
The porcupine (sometimes drawn in a style similar to a hedgehog) is a slightly more detailed kawaii animal, but still very manageable for beginners. Tatyana Deniz’s tutorial site specifically features the porcupine as a fun beginner project, and it’s a great way to practice adding texture.
Steps:
- Draw a circle for the face/head.
- Attach a rounded, teardrop-shaped body to the right or left side of the head.
- Draw two large eyes on the face with highlight dots.
- Add a small round nose and a tiny smile.
- Sketch blush circles on the cheeks.
- Draw a small ear on the top of the head.
- For the spines: draw short, slightly curved lines radiating outward from the back and top of the body. Layer them in rows for a full, spiky look.
- Add two small front paws visible beneath the face.
- Draw two small feet at the bottom.
Pro tip: The spines are the most time-consuming part, but they don’t need to be perfect — slightly uneven lines actually look more natural and charming. ✨
Tips to Improve Your Kawaii Drawing Skills Fast
Now that you’ve worked through all 9 Easy Kawaii Animals to Draw for Beginners (Step-by-Step), here are some proven strategies to accelerate your progress.
Practice Consistently (Even for Just 10 Minutes a Day)
Studies in skill acquisition consistently show that short, daily practice sessions outperform occasional long sessions. Even 10 minutes of sketching each day will produce noticeable improvement within a few weeks.
Use Reference Guides and Video Tutorials
Online resources are richer than ever in 2026. YouTube playlists dedicated to kawaii animal drawing offer real-time guidance — you can pause, rewind, and follow along at your own pace. Library resources and dedicated tutorial websites also provide free, structured step-by-step guides for dozens of animals beyond the nine covered here.
Start with Pencil, Finish with Ink
Always sketch lightly in pencil first. Once you’re happy with the proportions, trace over your lines with a fine-tip black marker. Let the ink dry completely before erasing the pencil marks — this prevents smudging and gives your drawing a clean, professional finish.
Master the Eyes First
💬 “If you can draw a great kawaii eye, you can make almost anything look cute.”
The eyes are the soul of kawaii art. Practice drawing just eyes — big circles, smaller pupils, and a tiny white highlight dot — on a separate sheet until they feel natural. This single skill will elevate every drawing you create.
Experiment with Color Palettes
Kawaii art traditionally uses soft, pastel colors: blush pink, mint green, lavender, baby blue, and warm yellow. Avoid harsh, saturated colors for a more authentic kawaii feel. Colored pencils, brush markers, and watercolors all work beautifully.
Common Beginner Mistakes to Avoid
- ❌ Making the eyes too small — go bigger than feels natural at first
- ❌ Overcomplicating the body — kawaii bodies are simple and chubby
- ❌ Pressing too hard with pencil — light strokes are easier to erase and refine
- ❌ Skipping the blush marks — those two small circles make a huge difference
- ❌ Rushing the inking step — wait for ink to fully dry before erasing
Frequently Asked Questions
Q: Do I need any drawing experience to try these kawaii animals?
No experience is needed. Every animal in this guide starts with basic shapes like circles and ovals. If you can draw a circle, you can draw kawaii.
Q: What’s the best paper for kawaii drawing?
Standard printer paper or a smooth sketchbook works well. Avoid textured paper when using fine-tip markers, as it can cause the tip to fray.
Q: Can I use these drawings for stickers or digital art?
Absolutely! Many artists scan or photograph their kawaii drawings and digitize them using free apps like Procreate, Canva, or Ibis Paint X. In 2026, digital kawaii sticker creation is a popular hobby and even a small business opportunity.
Q: How long does it take to learn kawaii drawing?
Most beginners can draw a recognizable kawaii animal within their first session. Consistent practice over 2–4 weeks typically leads to confident, polished results.
Q: Are there more than 9 kawaii animals I can learn to draw?
Definitely! Resources like Easy Drawing Guides offer over 100 animal drawing tutorials, and collections featuring 35+ cute animal ideas are widely available online. The nine animals in this guide are simply the best starting points for absolute beginners.
Conclusion
Learning to draw kawaii animals is one of the most rewarding creative hobbies you can pick up in 2026 — it’s low-cost, deeply satisfying, and produces results you’ll actually want to share. This guide to 9 Easy Kawaii Animals to Draw for Beginners (Step-by-Step) has given you a complete toolkit: the kawaii formula, nine fully detailed animal tutorials, and practical tips to keep improving.
Your Actionable Next Steps 🎯
- Gather your tools — pencil, eraser, black marker, and paper.
- Start with the kawaii cat or chick — they’re the simplest entries in this list.
- Draw one animal per day for nine days — by the end, you’ll have a complete kawaii animal collection.
- Share your work — post to social media with tags like #kawaiidrawing or #kawaiianimal to connect with a global community of kawaii artists.
- Explore video tutorials on YouTube for visual guidance and discover new animals to add to your repertoire.
Every great artist started exactly where you are right now — with a blank page and a willingness to try. Pick up your pencil and draw your first kawaii animal today. 🌸